A snowflake screen on your Sanyo TV can be frustrating. It’s a white screen with black dots, often called static. This issue usually means your TV isn’t getting a proper signal. The good news? You can often fix it yourself. This guide provides clear, step-by-step instructions to resolve the snowflake screen issue on Sanyo TVs.
Understanding the Snowflake Screen
The snowflake screen looks like a fuzzy, static-filled display. You might see no picture or hear no sound. This issue often occurs when the TV can’t find a video signal. In older analog TVs, a weak signal caused static. Modern digital TVs, like many Sanyo models, might show a “no signal” message or static in some cases. For example, the Sanyo DP19640, a model with both analog and digital tuners, can display a snowflake screen if the signal is lost.
This problem isn’t unique to Sanyo TVs. It can happen with any TV brand. The causes are usually simple, like wrong settings or loose cables. Let’s explore why this happens and how to fix it.
Common Causes of Snowflake Screen on Sanyo TVs
Several issues can lead to a snowflake screen. Here are the most common reasons:
- Wrong Input Source: The TV might be set to an input not connected to a device, like HDMI 1 when your cable box is on HDMI 2.
- Disconnected or Powered-Off Devices: If your cable box, DVD player, or streaming device isn’t on or connected, the TV shows static.
- Poor Antenna Signal: For over-the-air channels, a weak or disconnected antenna can cause a snowflake screen.
- Software Glitches: Temporary software issues in smart TVs can disrupt the signal, fixable with a reset.
Understanding these causes helps you troubleshoot effectively. Let’s move to the solutions.
Step-by-Step Troubleshooting Guide
Follow these steps to fix the snowflake screen on your Sanyo TV. Try each one in order until the issue is resolved.
Step 1: Check Your TV’s Source or Input
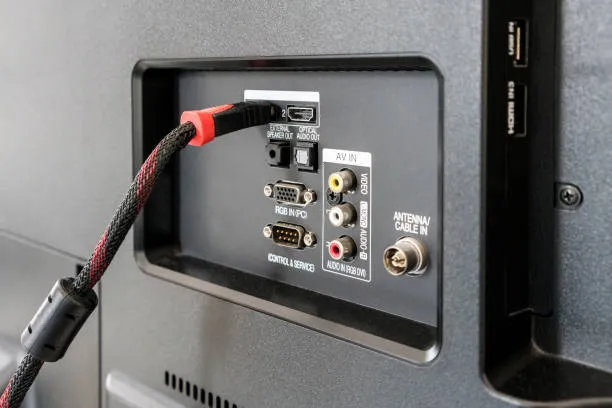
Your TV needs to be on the correct input to display a picture. The input source tells the TV where to look for the signal, like HDMI for a cable box or AV for a DVD player.
- Find the “Input” or “Source” button on your Sanyo TV remote.
- Press it to cycle through inputs (e.g., HDMI 1, HDMI 2, AV, Antenna).
- Select the input matching your device. For example, if your cable box uses HDMI 1, choose HDMI 1.
- Check if the screen clears up.

Step 2: Ensure Input Devices Are Plugged In and Turned On
If the input is correct but the screen is still snowy, check your devices.
- Confirm that your device (e.g., cable box, streaming stick, DVD player) is powered on.
- Check all cables connecting the device to the TV. Ensure they’re secure.
- For HDMI connections, verify the cable is firmly plugged into the correct HDMI port.
- For AV connections (red, yellow, white cables), ensure each cable matches the correct port.
Step 3: Check Antenna Connection
If you use an antenna for over-the-air channels, a weak or disconnected antenna can cause a snowflake screen.
- Ensure the antenna cable is securely connected to the TV’s antenna input.
- Adjust the antenna’s position to improve signal strength. Point it toward a broadcast tower if possible.
- Go to your TV’s menu, select “Channel Setup,” and choose “Auto Scan” to find available channels.
- Weather or location can affect signal quality. If the signal remains weak, consider an amplified antenna.
Step 4: Perform a Soft Reset
A soft reset can fix software glitches, especially in smart Sanyo TVs.
- Unplug your TV from the power outlet.
- Wait for at least 1 minute to let the TV reset.
- Plug the TV back in and turn it on.
- Check if the snowflake screen is gone.
Step 5: Check for Firmware Updates (Optional)
For smart Sanyo TVs, a firmware update might resolve signal issues.
- Go to the TV’s menu and look for a “Software Update” or “Firmware Update” option.
- Follow the prompts to check for updates. Ensure your TV is connected to the internet.
- Install any available updates and restart the TV.
When to Seek Professional Help
If the above steps don’t fix the snowflake screen, the issue might be more serious. Damaged input ports, a faulty tuner module, or internal hardware problems could be the cause. Here’s what to do:
- Check if your TV is under warranty. Contact Sanyo support at Sanyo AV Support for assistance.
- For older models (pre-2014 or ending in “T”), support may be limited, but FAQs are available .
- Consider hiring a professional TV technician for a diagnosis.
- If repairs are costly, compare the cost to a new TV. Modern 40-inch TVs can cost under $200, especially during sales.
Preventive Measures
To avoid future snowflake screen issues:
- Regularly check cable connections for wear or looseness.
- Keep your TV’s software updated if it’s a smart TV.
- For antenna users, periodically rescan channels to maintain signal quality.
- Avoid placing your TV near devices that might interfere with signals, like microwaves.
Frequently Asked Questions
What causes a snowy screen on a TV?
A snowy screen usually means the TV isn’t receiving a signal. This can happen due to a wrong input source, disconnected devices, poor antenna signal, or software issues .
How do I know if my TV is on the correct input?
Press the “Input” or “Source” button on your remote. Cycle through options until you select the input matching your device, like HDMI 1 for a cable box.
Can a snowy screen be fixed without a technician?
Yes, most cases are fixed by checking inputs, securing cables, adjusting the antenna, or resetting the TV. Try the steps above before calling a professional.
Is the snowflake screen issue specific to Sanyo TVs?
No, it can happen on any TV brand. It’s a common issue related to signal problems, not specific to Sanyo .
Why is my TV snowy with cable?
If using cable, ensure the cable box is on and connected properly. Check that the TV is on the correct input. If the issue persists, contact your cable provider to check the signal.
What does it mean when my TV has snow?
It means the TV isn’t receiving a proper signal, often due to incorrect settings, loose cables, or a weak antenna signal.
Conclusion
The snowflake screen issue on your Sanyo TV is usually easy to fix. Start by checking the input source, ensuring devices are connected and powered on, and verifying antenna connections. A soft reset can resolve software glitches. If these steps don’t work, contact Sanyo support or a technician. Regular maintenance, like checking cables and updating firmware, can prevent future issues. Follow these steps carefully, and you’ll likely have your TV working again in no time.
Read more articles about Sanyo TV: