Roku TVs are popular for their simple interface and streaming services. Sometimes, you need to switch from streaming to another device, like a gaming console or cable box. Changing the input on your Roku TV is easy, whether you have the remote or not. This guide explains how to change inputs, set a default input, use HDMI-CEC, and fix common issues. Follow these steps to switch inputs quickly.
Understanding Inputs on Roku TV
Inputs are ports on your TV where you connect devices. Knowing your TV’s inputs helps you switch between devices easily. Most Roku TVs have these inputs:
- HDMI ports: For modern devices like gaming consoles, Blu-ray players, or streaming sticks. Many models have 4 HDMI ports, including one HDMI eARC for enhanced audio.
- Composite (A/V): For older devices using red, white, and yellow cables.
- USB: For USB drives or peripherals.
- Antenna: For over-the-air TV channels.
Some Roku TVs include an Ethernet (LAN) port for wired internet, but this is not a content input. Older models may have fewer options, mainly HDMI, antenna, and A/V. Check your TV’s manual or back panel to confirm available ports.

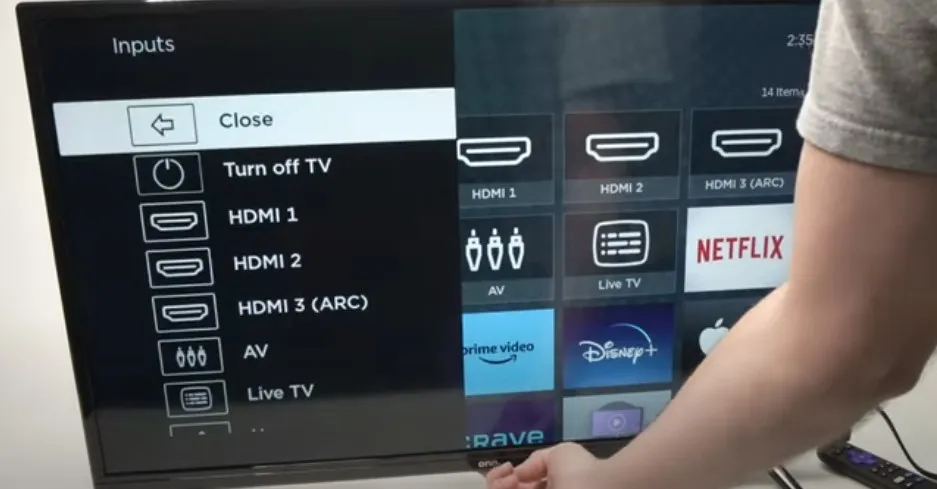
How to Change Input Using the Remote
The easiest way to change inputs is with the Roku remote. Here’s how:
- Turn on your Roku TV and the device you want to use.
- Press the Home button on your remote to open the main menu.
- Use the arrow keys to select Settings.
- Scroll to TV inputs and press OK.
- Choose the input (e.g., HDMI 1, HDMI 2, AV) and press OK.
- If setting up an input for the first time, select Set up input to add it to the home screen.
- Return to the home screen and select the input to switch.
This process takes about 10 seconds. Ensure the connected device is powered on to avoid a “No Signal” message.
How to Change Input Without a Remote
Lost your remote? You can still change inputs using physical buttons or the Roku mobile app.
Using Physical Buttons on the TV
Most Roku TVs have buttons for basic controls. Their location varies by model, often on the middle underside, left or right back, or front left underside. Check your TV’s manual for exact placement.
- Find the Input or Source button, sometimes labeled “TV/Video.”
- Press it repeatedly to cycle through inputs until you reach the desired one.
For TVs with multiple buttons:
- Power and Volume buttons: Long-press both to display the input menu. Use the Volume button to select an input.
- Power button only: Press once to show the menu, press again to select an input, and release to confirm.
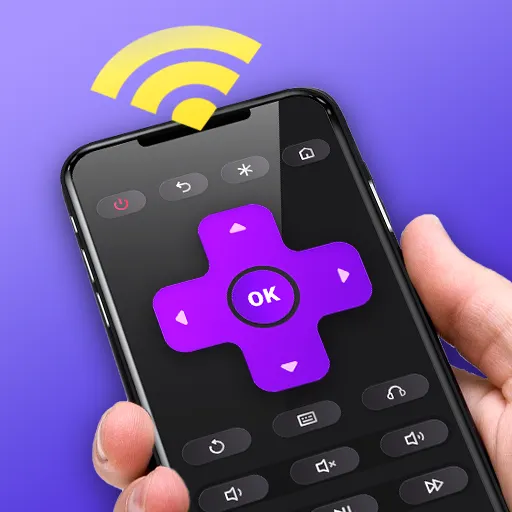
Using the Roku Mobile App
The Roku mobile app acts as a virtual remote. Here’s how to use it:
- Download the Roku app from the App Store or Google Play Store.
- Connect your phone to the same Wi-Fi network as your Roku TV.
- Open the app and log in with your Roku account.
- Select your Roku TV from the device list.
- Tap the Remote icon to access the virtual remote.
- Press the Home button, navigate to Settings > TV inputs, and select your input.
The app also offers voice control and private listening features.
Setting the Default Input
To make your TV start on a specific input, set it as the default:
- Press the Home button on your remote or app.
- Go to Settings > System > Power.
- Select Power on.
- Choose your preferred input (e.g., HDMI 1, Antenna).
Now, your TV will automatically switch to this input when powered on. This is useful if you mainly use one device, like a cable box.
Using HDMI-CEC to Control Inputs
HDMI-CEC (Consumer Electronics Control) lets you control multiple HDMI devices with one remote. If your TV and devices support it, the TV can switch inputs automatically when a device turns on. HDMI-CEC functionality depends on your TV and connected devices. Check your device manuals for compatibility.
To enable HDMI-CEC:
- Press the Home button.
- Go to Settings > System > Control other devices (CEC).
- Enable 1-Touch Play or similar options.
For example, turning on a gaming console might switch the TV to its HDMI port. Different brands call HDMI-CEC by names like Anynet+ (Samsung) or SimpLink (LG). Not all devices support HDMI-CEC, and compatibility varies.
Troubleshooting Common Input Issues
If you can’t change inputs or see your device, try these fixes:
These steps resolve most issues. If problems persist, consult your TV’s manual or contact Roku Support.
Conclusion
Switching inputs on your Roku TV is simple with the right steps. Use the remote for quick changes, physical buttons or the Roku app if the remote is unavailable, or set a default input for convenience. HDMI-CEC can automate switching, and troubleshooting fixes common problems. With this guide, you can easily manage your TV’s inputs.
For more Roku tips, check out: