A dark or flickering TV screen can ruin your viewing experience. Often, the culprit is a faulty backlight. This guide explains how to diagnose and fix TV backlight problems. It’s written for beginners, with clear steps to help you save money on repairs. We’ll cover symptoms, causes, DIY fixes, and when to consider a new TV.
What Is a TV Backlight?
LCD TVs use LED strips to light up the screen. These strips, called backlights, sit behind the liquid crystal display (LCD). The LEDs shine light through the LCD to create the images you see. If the backlight fails, the screen may appear dark, dim, or uneven, even if the TV’s other parts work fine.
Signs of Backlight Failure
Backlight issues show up in a few ways. Here are the most common signs:
- No Picture, Sound Works: The screen is black, but you hear audio or can change channels.
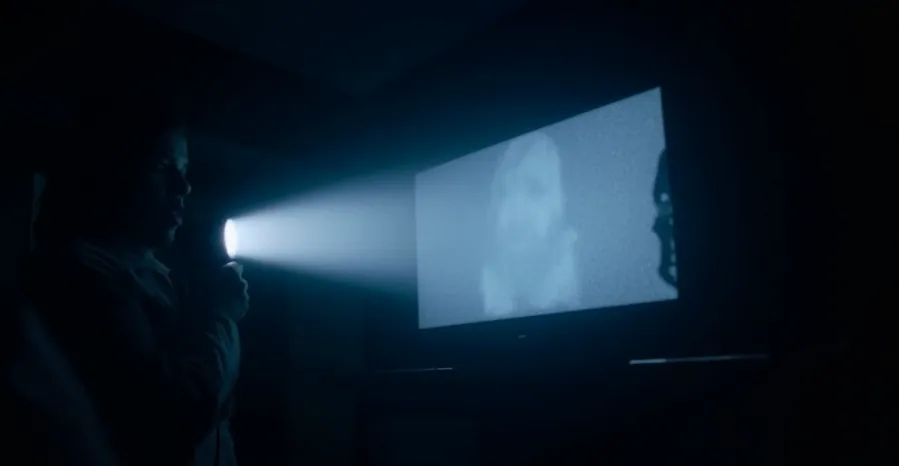
- Faint Image with Flashlight: Shine a flashlight at an angle on the screen. If you see a dim image, the backlight is likely broken.
- Dim or Flickering Screen: The picture is too dark or the brightness changes randomly.
- Dark Spots or Uneven Lighting: Parts of the screen are darker than others.
If you notice these issues, the backlight is probably the problem. Let’s confirm it.
Diagnosing Backlight Problems
Before fixing anything, you need to be sure the backlight is the issue. Here’s how to check:
The Flashlight Test
- Turn on your TV and play some content, like a movie or show.
- Dim the room’s lights.
- Shine a flashlight at an angle onto the screen.
- Look closely. If you see a faint image, the LCD panel works, but the backlight doesn’t.
Check for Uneven Lighting
If the screen is on but has dark patches or uneven brightness, some LED strips may be faulty. This is common in edge-lit TVs, where LEDs are around the screen’s edges.
Listen for Sounds
If the TV powers on, plays audio, or lets you change channels but shows no picture, the backlight is likely the issue.
Is It the Backlight or Something Else?
Sometimes, a dark screen could be due to a faulty power supply or main board. To rule these out:
- Check if the TV’s power light is on.
- Ensure all cables (HDMI, power) are secure.
- Try plugging the TV into a different outlet.
If these don’t help, the backlight is the likely culprit. For more on black screen issues, see our guide on Fixing Element TV Black Screen.
Why Do Backlights Fail?
Backlights can fail for several reasons. Knowing these can help you prevent future problems:
- Heat: Too much heat damages LED strips. Poor ventilation or high brightness settings can cause this.
- Age: LEDs wear out over time, especially after years of use.
- Power Surges: Voltage spikes can harm the backlight circuitry.
- Defects: Some TVs have manufacturing flaws that lead to early backlight failure.
Understanding these causes helps you decide whether to repair or replace your TV.
Should You Fix It or Buy a New TV?
Before diving into repairs, consider your options:
- DIY Repair: Replacing LED strips costs $30–$60 and can be done at home with basic tools. It’s a good choice if you’re comfortable with electronics.
- Professional Repair: Hiring a technician may cost $100–$200, depending on your TV model and location. This is ideal if you’re not confident in DIY.
- New TV: If your TV is old (over 5–7 years) or has other issues, a new TV might be cheaper. New TVs start at $100–$200 for smaller models.
To decide, compare repair costs to the price of a new TV. Also, check if your TV is under warranty, as opening it may void coverage. For more on TV issues, read our article on Fixing Samsung TV Black Screen.
Step-by-Step Guide to Replacing LED Strips
Replacing backlight LED strips is a common fix. It requires care but is manageable for most people. Here’s how to do it:
Tools and Parts Needed
- Phillips and flathead screwdrivers
- Multimeter for testing
- Replacement LED strips (specific to your TV model)
- Adhesive tape or glue (if needed)
- Safety gloves and glasses
You can find LED strips online at places like TV Parts Today or Amazon.
Step 1: Safety First
- Unplug the TV and wait 30 minutes to discharge electricity.
- Work in a well-lit, static-free area to avoid damaging components.
- Wear safety gloves and glasses to protect yourself.
Step 2: Disassemble the TV
- Remove the back cover by unscrewing all screws. Keep screws organized.
- Disconnect cables or ribbons connecting the back cover to internal parts.
- Be gentle to avoid damaging delicate components.
Step 3: Access the LED Strips
- Depending on your TV, you may need to remove the LCD screen or other panels.
- Handle the LCD screen carefully to avoid cracks or damage.

Step 4: Identify Faulty Strips
- Look for burnt LEDs, broken connections, or other visible damage.
- Use a multimeter to test voltage across each strip or LED. A backlight tester can also help.
- If one LED fails, the whole strip may stop working, like Christmas lights.
Step 5: Replace the Strips
- Carefully remove old LED strips. They may be glued or taped.
- Install new strips, ensuring they align properly and are secure.
- Use adhesive if needed to hold them in place.
Step 6: Reassemble the TV
- Reverse the disassembly process, reconnecting all cables.
- Screw the back cover back in place.
Step 7: Test the TV
- Plug in the TV and turn it on.
- Check if the backlight works and the screen displays properly.
- If the issue persists, recheck connections or test the power supply.
For model-specific guides, check iFixit TV Repair Guides or watch tutorials like this YouTube LED Strip Replacement Video.
Preventing Future Backlight Issues
To keep your TV’s backlight working longer:
- Lower Brightness: Set brightness to a moderate level to reduce LED strain.
- Improve Ventilation: Place the TV in a well-ventilated area to avoid overheating.
- Use Surge Protectors: Protect against power surges with a surge protector.
- Update Firmware: Check for firmware updates every few months to improve performance.
These steps can extend your TV’s life. For more maintenance tips, see our guide on Resetting Toshiba TV.
When to Get a New TV
Sometimes, repairing isn’t the best choice. Consider a new TV if:
- Repair costs exceed $200 or approach the price of a new TV.
- Your TV is over 5–7 years old, as newer models are more efficient.
- The TV has other issues, like sound or connectivity problems.
For example, a new 32-inch TV can cost as little as $100–$200, as noted in an X post on TV repair costs. Weigh the costs and benefits before deciding.
Frequently Asked Questions
How do I know if my TV backlight is broken?
Use the flashlight test. If you see a faint image when shining a light on the screen, the backlight is likely faulty.
Is it worth repairing a TV backlight?
It depends. DIY repairs cost $30–$60, while professional repairs may cost $100–$200. If your TV is old, a new one might be cheaper.
Can a backlight fix itself?
Rarely. An X post on TV repair described a backlight fixing itself after storage, but this is uncommon and may not last.
Where can I buy replacement LED strips?
Try TV Parts Today or Amazon for model-specific strips.
Conclusion
Fixing a TV backlight can save you money and extend your TV’s life. With the right tools and patience, you can replace LED strips yourself. Always prioritize safety and double-check your work. If the repair seems too complex, a professional can help, or you might consider a new TV.
For more TV troubleshooting tips, check out our articles on Fixing LG TV Black Screen or Fixing TV No Picture.